The SmartEdit Writer application consists of two separate parts: the Project Manager, where you open a project or create a new project, and Writer, where you work on an individual project. Writer is where you will do most of your work and all of your creative work.
To get started, double click the desktop icon to launch the Project Manager. The first time you open the Project Manager a single sample project called “Huckleberry Finn” will be there. Once you create your own projects, they will be listed here in the order they were last opened. This provides a quick way to jump into the projects you are currently working on. Clicking on the name of a project will open that project in Writer.

To create a new project, click on the “Create New Project” button at the bottom of the Project Manager dialog. This is the only place where you can create a new project. You cannot create a new project from within the larger Writer application, as Writer can only open for an existing project.
Let’s create a new project and call it “The Mad Monk of Portrane.” Portrane is a small residential area on the coast in north Dublin whose sole claim to fame is the presence of a large Victorian asylum of architectural note.

After choosing a project name, which you can change later, you must choose a location for the project folder. This will default to the SmartEdit Writer folder inside your Windows Documents folder. Unless there is a pressing reason to change this location, you should leave it as is. You should resist any temptation to select a Dropbox or other cloud storage folder as the working location, as SmartEdit Writer will not work correctly from within a Cloud storage folder.
After clicking finish, the new project will be set up and opened in Writer. This may take about 5 seconds or so on a slow machine. When the project opens, it will be empty apart from a few default folders and scenes that are created automatically in the Document and Research trees — see the screenshot below.
Writer will open on the Start Page. This page contains of a few links back to the website under the Get Started section, as well as some commonly used options under the Actions section. These include exporting to a single Word document, opening the Project Manager, backing up your project and configuring the automatic backups. If you haven’t yet set a location for your automatic backups, you should do so now by selecting the Configure automatic backups link.
There are five toolbars in Writer, named Project, Actions & Tools, Word Processor, SmartEdit Editor and Help. The Project toolbar is where you will find buttons to create new folders, scenes and notes and add images or bookmarks. There are also buttons to move between your main Document tree and the Fragments tree on the left, and between the Research tree, Notes section and Daily Word Count section on the right.

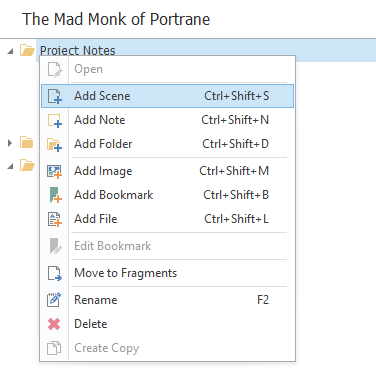
The Document tree is where your novel or short story lives. Here you add scenes and notes, move them around by dragging and dropping them until the structure is the way you want it, and open them in the word processor or in the notes section to the right. Select a folder and click the New Scene button, or open the right click menu and choose New Scene. An empty scene will open in the word processor and the scene will be highlighted in the Document tree so that you can give it a name.
Adding notes and folders works in the same way. To add a folder, scene or note to the top level, select the project name — “The Mad Monk of Portrane” and follow the same steps as above.

Scenes, notes, folders and even the project itself can be renamed by selecting the item in the tree, opening the right click menu, and choosing rename.
The Research tree to the right is where you store research material such as images, pdf or other files, as well as bookmarks to websites and web pages. You can also build up character profiles and outlines in this section by creating folders, scenes and notes, just as you do in the Document tree. The tree structures are fluid by design — you get to choose how to use them and to decide what goes where.
In the new project, double click on a note. One is called Notes, the other is called Brief Outline. This will open the note in the notes section to the right of the word processor. Notes were designed to hold small bits of text, usually about the scene or folder it is attached to, or about the project as a whole. Some writers like to have a note for each scene outlining the main points to hit in that scene, others prefer notes to sit at the folder level where they document the chapter as a whole. How you structure this is up to you.
Notes can be attached to anything in the any tree — scenes, folders, bookmarks, images, the project itself, even other notes. You decide which structure best suits your writing and organisational style. But remember, you can move these notes around by dragging and dropping at any time.
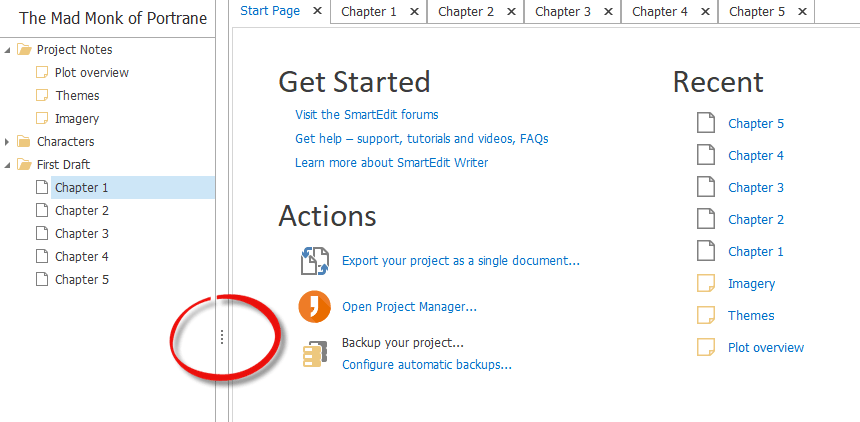
As you’re new to SmartEdit Writer, this is a good place to mention a quick customisation you may wish to carry out. The left and right sections can be widened if they appear too narrow on your PC. To do this, drag the separator to the right or left as shown below.

If you close and re-open your new project, you will find that any scenes or notes that were open when you closed it will be open when you re-open, allowing you to jump straight back in to your work.
If you prefer to write on a dark background, open the Settings dialog and switch on the Dark Theme. You’ll find more about that here.
That should be enough to get you started with your project. More advanced functionality such as Fragments, and importing your Word documents is outlined in other topics of this manual.

