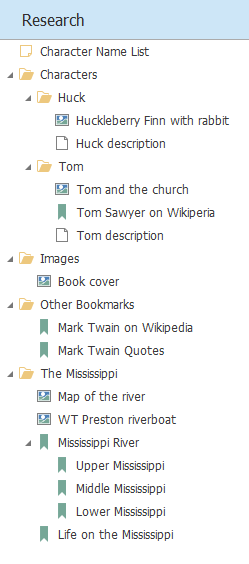
Think of the Research tree as a stack of folders filled with bits and pieces that you collect over the course of a year or more, all relating to your novel. You may have begun collecting these bits and pieces months before you began writing, and continued collecting as your novel progressed. Of course, nowadays that physical folder taking up so much space on your desk is online; paper documents are files and PDFs; photographs are images or links to images on websites.
SmartEdit Writer allows you to group your work-in-progress and any research you’ve built up about it into a single project. In the same way that you add folders, scenes and notes to your Document tree, you add them to your Research tree. Inside the Research tree you can also add files, PDF documents, images, and bookmarks to websites and web pages.
And of course notes, always there are notes.
To open the Research tree select the Research button on the Project toolbar or use the F8 shortcut key. The tree will open to the right of the word processor, occupying the same space as the Notes.

When you create a new project in SmartEdit Writer four folders will be created inside the Research tree. They are Bookmarks, Characters, Images and Documents & Files. If you are opening a project created using version 1 of SmartEdit Writer you will have to add these or other folders yourself. The four default folders are a guide only. You can rename them, drag and drop them to different locations, delete them or add new folders that better suit your requirements.

Add Image — Ctrl+Shift+M
Clicking the Add Image button, or choosing the same option from the tree’s right click menu, opens a standard File Open dialog. From here you can select any number of image files to import from your PC into your project. Each image will appear in the tree under the selected item and will have the same name as their original file. After import, you may decide to rename some of the images by using the standard tree rename option (F2 shortcut).
Double clicking an image file in the tree will open that image in your default image viewer — this will vary depending on which software you have installed on your PC. In my case it’s IrfanView.
Once added, image files are copied into the project folder. The originals remain where they are.
Add Bookmark — Ctrl+Shift+B
A bookmark is a link to a web page. Bookmarks can be attached to anything in the Research tree — to folders, scenes, files, notes, even other bookmarks. They are a handy way of storing quick links to webpages that have a bearing on your project. They can be links to Wikipedia pages, to online galleries, to books on Amazon, to Facebook pages, to forum posts, to anything online.
SmartEdit Writer does not copy any contents from web pages you bookmark, it simply maintains the web addresses and opens that page in your default web browser when you double click the bookmark in the tree.
The sample project shown above contains bookmarks to different pages on Wikipedia.
Add File — Ctrl+Shift+L
Adding a file works in the very same way as adding an image. The only difference is the icon that appears inside the Research tree after you import. Where possible, the imported file will show an icon common to its file type. If you choose any Word or other text documents to import they will be converted into scenes as part of the import process and can be edited inside SmartEdit Writer.
As with images the files you add are copied into the project, which means the originals remain untouched.
External files imported into your SmartEdit Writer project can be quite large, so they are not backed up when you click the backup button or as part of Automatic Backups. Single images taken with a digital camera could easily be 10 megabytes in size, and video files could be over a gigabyte in size. Allowing these files into your daily backups would fill up your hard drive or Cloud storage folder in a few weeks. You can read more about how to make a backup of your Research files here.
