You’ve created your project. You have a basic understanding of what the UI looks like and how it works. Now it’s time to get started on fleshing out your novel — adding chapters and scenes, attaching notes to those scenes, and getting on with the job of writing.
I’ll begin by explaining the Document Tree in some detail. The Document Tree is your manuscript, your novel broken down into its component chapters and scenes. This is where you add a new chapter, add a scene to a chapter, move scenes around until they’re in the right place, write notes for scenes or chapters. The Document Tree is where you structure your work in progress. It’s highly flexible — you decide how much detail you want to break your novel down into.
The definition of a folder or a scene is up to you. They become whatever you want them to be. For one writer, a folder could be used to contain all the work of a single chapter, in which case their Document Tree might have 30 folders, named “Chapter 1”, “Chapter 2”, etc. Inside each folder might be 5 or 10 scenes, each containing a single part of that chapter. A descriptive scene, followed by a meeting scene, followed by a fight scene, a discussion, a sex scene, whatever…
For another writer, coming from a long history of working in a single Microsoft Word document, breaking a novel down to such small pieces might be a step too far. They might choose to create a single folder called “First Draft”, which might contain 30 scenes numbered “Chapter 1”, “Chapter 2”, etc., and attach a single note to each scene.
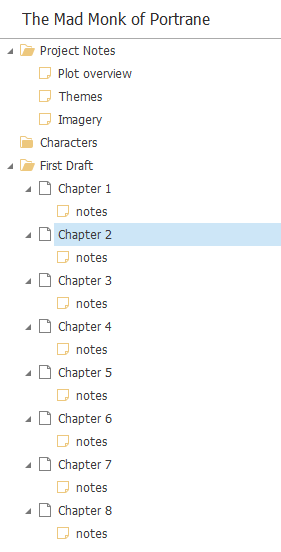
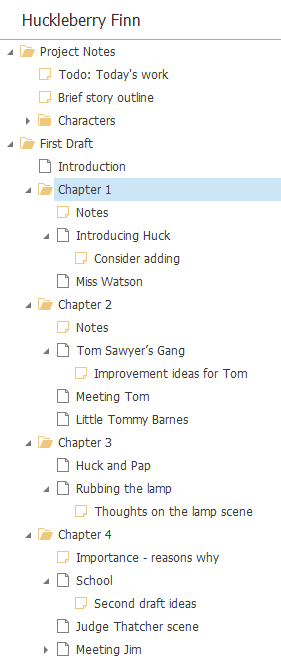
It really is up to you. Don’t let the SmartEdit Writer naming conventions of Folder, Scene and Note confuse you — YOU decide.
Speaking only for myself, I like to break down my work into a series of small scenes. One of the advantages of doing this is if I decide later that a particular 300 word scene should not happen in Chapter 7, where I originally wrote it, but in Chapter 12, I can easily drag it from the Chapter 7 folder and drop it into the Chapter 12 folder. Or I may decide that a scene I wrote a month ago should not be used at all, in which case I select it and click the Move to Fragments button, removing it from my Document Tree but maintaining it in Fragments in case I want to read or use it later.
Adding Folders, Scenes, and Notes is easy. You simply select the parent item in the tree and click the button on the toolbar to add a new scene, note or folder. Or right click on the tree and choose from the menu that appears. If you want to add a new item (folder, scene or note) to the top level of your novel, select the project name at the very top of the Document Tree and click an add button in just the same way.

When to comes to adding new items to the Document Tree, there are some limitations. You can add folders to other folders, and you can go as many levels deep as you wish. You can add scenes to folders and you can even add scenes to other scenes. Scenes cannot be added to notes. Speaking of notes, they can be attached or added to anything: to folders, to scenes, even to other notes.
Notes in a SmartEdit Writer project are everywhere. They are incredibly versatile and form a major component of the UI. If you choose not to use notes or to use them sparingly, you will miss out on one of SmartEdit Writer’s key features.
Notes really come into their own for writers who are plotters and planners. If you’re the sort of writer who sits down without knowing what you’re going to write, you may not find notes that useful. But for the writer who plans out each scene in advance, notes are fantastic.
I’ve tried to make notes a fully integrated part of the user interface, so that when you are working on a scene, you can have the word processor open in the centre of the screen, your Document Tree to the left, and the notes for that scene open to the right. This way you can refer to the notes as you work without having to open different windows or interrupt your flow.
The Notes editor uses the same toolbar as the primary word processor, which means you can use the full range of word processor features such as bold, italic, lists, etc. within a note as you can within the word processor.
The more time you spend using the Document Tree — adding folders and scenes, creating notes, dragging and dropping items around — the sooner you’ll get the hang of it. The key thing to remember is that you decide how your Document is structured. Every writer works differently. You should aim to bend the SmartEdit Writer project structure to meet your way of working rather than feel the need to change the way you work.
Dragging and Dropping
To move things around in the Document, Fragments and Research trees, you need to drag and drop. Positioning something so that it goes where you want it to go using drag and drop can be tricky at first, but once you get the hang of it, you’ll find it to be straight forwards.
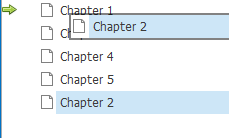
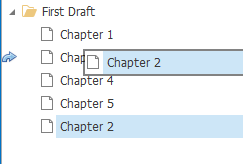
Once you begin to drag a scene or note, you’ll notice a small icon appearing to the left of each item you drag over. In the example below, there’s a green arrow just before I drop Chapter 2 on top of Chapter 1. The green arrow means the item will be dropped inside the other item. In this case, this is not what I want to do, as I’m looking to drag Chapter 2 so that it is next to, and not inside Chapter 1.
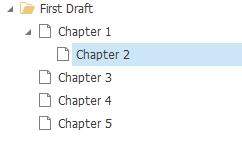
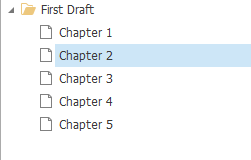
If I try again, and move a little more slowly this time, a blue arrow will appear. This blue arrow means Chapter 2 is about to be dropped above Chapter 3, which is the outcome I’m looking for. Keep an eye on the arrows that appear as you move so that you achieve the desired outcome. It may take you a few attempts to get this right as you start out, but will quickly become second nature.
Fragments
Fragments are unique to SmartEdit Writer and are one of my favourite features. I built Fragments into the project because I needed somewhere to store my bits and pieces — scenes or notes about scenes that I no longer need or that I have chosen to exclude; a page of dialogue that I penned weeks ago that has nowhere to sit in my novel; scenes involving a character that I’ve since gotten rid of.
Think of Fragments as a desk drawer for your current work in progress. You toss in things that might or might not be used later, or scenes or chapters that you know will not be used but that you don’t want to toss in the bin.
Fragments are always there, a part of your project that you can come back to at any time, but NOT a part of your Document or novel. When the time comes to create a single document or manuscript at the end of the first or second draft stage, any Fragments will be left out.
The Fragments tree is accessible by clicking the Fragments button on the toolbar. It occupies the same space to the left of the word processor and works in the same way as the Document Tree. You can open any scenes or notes it contains, you can move them around by dragging and dropping, you can delete them if you choose. And you can create new folders, scenes and notes from scratch, right inside the Fragments tree.
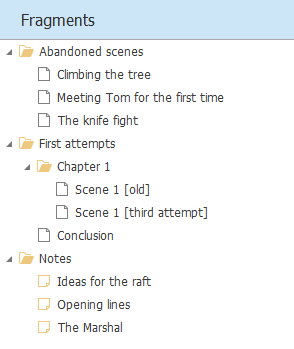
You can move anything from the Document tree to the Fragments tree using the Move to Fragments button on the toolbar or from the right click menu. Moving something back from Fragments to your Document works in the same way, by selecting the item in the Fragments tree and choosing Move to Document. When you move something in this way it will be placed at the very bottom of the other tree.
By the time you reach the end of the third draft of your 80,000 word novel, you may find that your Fragments tree is larger than your Document tree.
Copying Scenes
As you work, you may want to make a copy of a scene before you make a large change, or before you start editing that scene for the day. Version 8 introduced a new “Create Copy” mechanism for scenes. This is accessible from the right click menu after you select a scene, and from the main Project toolbar.
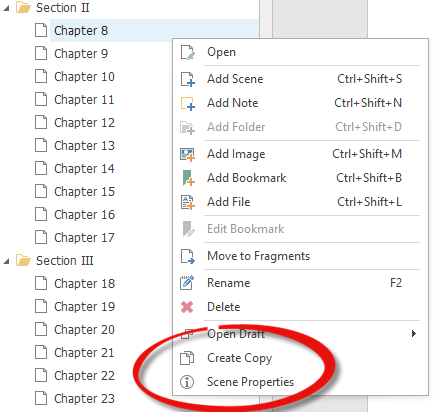
Create Copy copies the selected scene as a sub-scene within itself. This way you can easily build up a list of old copies for a scene and you always know where they are. The copy has its own unique icon and is dated with the date the copy was made, making them easy to identify and to work with.

In most respects, a copy of a scene behaves in just the same way as every other scene. You can move it around, edit it, delete it or even rename it. Where copied scenes differ is that when you export your document as a single Word document, copied scenes are excluded. They are also excluded from any checks run by the SmartEdit Editing functionality and from Document level and daily word count totals.
Scene Properties
Introduced in Version 9.
Meta data about each scene can be viewed, and in some cases changed, by opening the Scene Properties dialog from the the scene right click menu. This option is below the “Create Copy” menu.
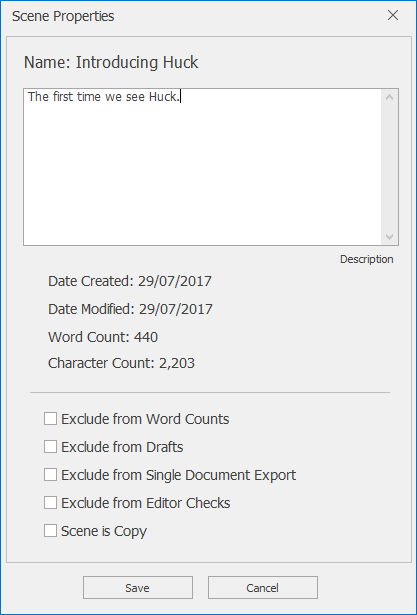
The dialog displays the created and modified dates for the scene, an editable description of that scene, and a series of checkboxes that allow you to configure how that scene is treated during a range of actions.
You may wish to exclude certain scenes from certain actions. For example, you might have a scene that contains character or plot information, a scene that is a working To-Do list, or that contains some other text that should not be part of your final work. Choosing to exclude a scene like this from various actions would make sense.
Exclude from Word Counts
Choose whether or not the scene is included in daily word count and Document word count totals.
Exclude from Drafts
Do not include the scene when creating a full Document Draft.
Exclude from Single Document Export
Do not include the scene as part of any Document Export.
Exclude from Editor Checks
Do not include when running SmartEdit Editor checks at the Document or Folder level.
Scene is Copy
Copied scenes are automatically excluded from all of the above actions. You can remove or add the copy flag from a scene with this option.
Images, Bookmarks & Files
Up until version 6, images, files and bookmarks could only be added to the Research tree. While it is a good idea to keep all research in one place, many users (myself included) wanted the option to add a small selection of links or images directly into the Document tree.
Version 6 opened up these additional options to the Document and Fragments trees. Just as you add a scene, folder or note, you can now add an image, external file or bookmark.
